


Article by Lisa Sheppard
There are a multitude of reasons as to why so many Interactive Whiteboards are not being used to their full potential in classrooms. Largely due to a lack of teacher training and support in the area of ICT, specifically aimed at improving teachers skills at the board and the amount of time it takes to create quality flipcharts.
As a graduate student, brimming with an idealistic view of the teaching profession, I could instantly see the potential an Interactive Whiteboard could have in my classroom. It took me two years to cover up the blackboards throw out the chalk and dust off this prehistoric notion that an Interactive Whiteboard does not belong in the music classroom.
Over time I created a range of simple flipcharts that I could use in all my lessons. The amount of time I found myself spending at a normal whiteboard was dramatically reduced in favour of an IWB.
What I discovered was a significant improvement in terms of students overall engagement in lessons, an added interest in what students were learning and the production of a higher quality of student work.
As with all technology, it hasn’t always been a smooth process! It has been one that has required a lot of patience and perseverance but overall I believe it has been a worthwhile journey. One that has developed and enhanced my teaching practice and added that little bit of interactive fun to my lessons!
Here are some ideas and tips about the best ways to engage students at the IWB during lessons:
- KIS – Keep it short! Keep the activities at the board short (just like you do at a normal whiteboard). Designing a whole lesson around one flipchart activity is boring, unproductive and, well, basically a recipe for disaster!
- Intersperse activities: Design 2 – 3 minute activities interspersed throughout the whole lesson. Depending on the year level I may have an activity that lasts for a maximum of 5 minutes.
- Interactive and engaging: Design your flipchart so there is more than one activity in the flipchart for students to complete.
- Surprise! Only give those students who are modeling the correct behaviour at the board the opportunity to find something that is hidden, like an extra sound or picture.
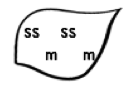
Example Prep Activity: Thematically linked flipchart for ‘Bee Bee Bumble Bee’.
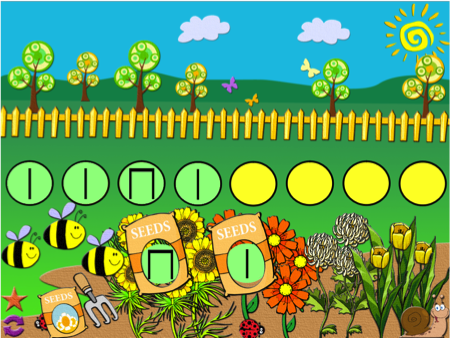
(Hey Presto Productions: Primary Music Flipchart 2)
The ‘Hidden action’ can be attached to the Beat circles to reveal the beat numbers (as seen above). One student is chosen to reveal the beat numbers hiding underneath the circles. (This activity is great for those students who need extra practice at visually tracking the beat.) While they are working at the board keep the whole class engaged in what is going on at the board:
- Count the beat out loud when the beat circle is clicked
- Perform the beat quietly with the teacher as the beat circles are clicked, by tapping, clicking etc…
- Provide the class with a beat tracking template so everyone can track the beats together in class
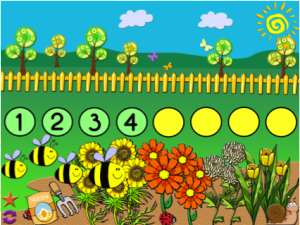
Practice Beat Tracking
Those students who have demonstrated exemplary musicianship skills should have a turn at the board first:
- It may mean that little Johnny performed the beat so perfectly that it is now his turn to reveal the beat numbers at the board (make it a big deal!)
- “Did everyone see how Lucy performed the beat?” Now it can be Lucy’s turn to perform in front of the class while Stephanie is chosen to visually track the beat at the board.
Spend a few minutes tracking in time to the beat. Choose a few different students up at the board while the rest of the class follows using templates:
- Teacher performs the beat, (clapping or performing on a drum)
- One student is chosen to be at the IWB
- Whole class points to their template, or performs together with the teacher, or practices ‘inner hearing’ the beat numbers.
Sound Recording
This type of beat practicing provides the perfect opportunity to record the students using the sound recorder at the board. This is a simple and effective way of choosing another student up at the board to ‘press play’ and the whole class can listen and evaluate their performance of the beat. This provides the teacher with an opportunity to model the language musicians use when constructively evaluating a class performance.
You may choose to complete the beat activities in one lesson and then return to the rhythm focus the next lesson. Again this depends on how long the activities take the students to complete. It may be time to move onto a game or another activity and keep the rhythm practice for the next lesson.
Rhythm
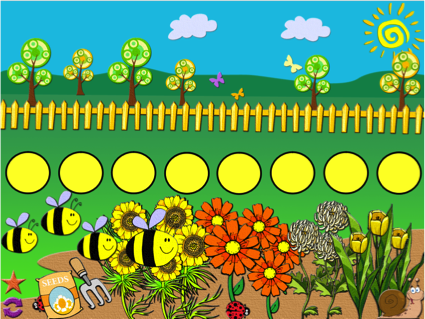
(Students click the star button to reveal the magic seeds bag. They move the seeds bag around until they can find the taa that is hiding behind the bee and the ti-ti that is hiding behind the biggest orange flower.)
Depending how advanced the students’ are, you can choose 8 individual students up at the board to fill in the rhythm or only 2 students to cover 4 beats each.
Advanced technique: In the above Hey Presto Flipchart a container action has been added to the beat. This means if a student makes a mistake the rhythm will jump back to its original position. A ‘reward sound’ will be played if they place the correct rhythm in the beat circle.
This activity should only take a few minutes of the lesson. It is important to monitor the class and reward those students who have modelled the best behaviour to have a turn at the board.
Extra Sounds
“Who has been listening really well at the IWB today? William has been sitting up nice and straight and following perfectly. He can come up to the board to see if there are some sounds hiding in the flipchart.”
Let William find one hidden sound. Then say: “Let’s see who was watching and listening perfectly while William was up at the board?”
Always have a number of hidden features in your flipchart. These could thematically link to your song material for example: bees buzzing, birds chirping, environmental sounds or reward sounds like ‘yippee’, ‘well done’ etc…
Setting the Expectations
By asking the questions above, you have immediately set the expectations for how students should behave at the board. The next time you have a flipchart activity the students will know exactly how to behave and will demonstrate that behaviour in order to be chosen.
It is unlikely that you will let everyone have a turn in the one flipchart activity – and that is OK. Students need to learn that they will get a turn eventually, just like they will get a turn to be the mouse or the cat in the game ‘Little Mouse be Careful’. There is always next time!
If you set the flipchart up as above it will be possible to get through half the class in one lesson. If you really want to, you can make a note on a class list of those students who need to have a turn next time. Or before the activity, you could pull out names from an interactive lolly jar: ‘Who’s turn is it next?’
Class Engagement
Always keep the rest of the class engaged in the activity. If you know that the activity will take a little longer at the Interactive Whiteboard, hand out a worksheet, or music stave templates and counters.
One idea that I implemented in my teaching from attending Maree Hennessy’s Primary Technique class at the seminar is that I purchased a class set of small rhythm writing magnetic boards with markers and magnetic staves with magnetic counters. (this way students can show their answers without the counters flying everywhere!)
This is a great way to get students used to the idea that it is OK to make mistakes – it doesn’t have to be perfect! It also gives them plenty of practice before they get to a worksheet.
Group Work
One component that I have really focused on during my teaching this year has been a focus on group work. Here are some ideas to get students working in small groups and using the board at the same time.
Mix n’ Match
Class is divided into small groups. Each group is given flashcards or thematically linked cards such as four laminated apples and four matching leaves. The idea is to match the solfa on the leaf to the matching apple with the music notation.

The first group to answer correctly can complete the same activity at the board and the rest of the class can check their answers.
The next lesson:
Ask the class who can remember how to match the solfa with the music notation. One student is chosen at the board (or a pair of students) to work out the song while the class is getting set up with a worksheet of the same activity. Then use the translucency slider to hide different apples or leaves and get the students to complete the worksheet from memory.
Flashcards
The interactive whiteboard is great for all your flashcard work.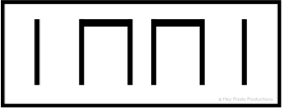
- Divide the class into pairs. One pair can work at the interactive board to design their own 8 beat rhythms using flashcards.
- Other pairs can work from their own individual flashcards, worksheet, or students can improvise some rhythms. Ask individual pairs to perform. Then rotate the pairs of students.
- Another way to set this up in the classroom is to divide your class into stations, including the board as one station.
- Group 1 at the board: Create a 16 beat rhythm at the board
- Group 2: ‘Perform’ the rhythm (that is on the board)
- Group 3: ‘Apply’ the rhythm on percussion instruments
- Group 4: ‘Improvise’ the rhythm, – Depending on the number of students or stations you want you could have a: ‘Flipped station’ where they need to perform it backwards, ‘Boing!’ station where students need to create body percussion to the rhythm or a special way to perform the rhythm.
- You could even have one group who ‘Records’ each group’s different task performance at the board. Then you have a collection of sound files that students can listen to and evaluate.
Mystery Song
One student is chosen to pull the mystery song from the hat at the board. Once the mystery song is known another student can find the matching flashcards.
- The whole class can use rhythm whiteboards and write down the whole song from memory while some students are up at the board.
- Whole class completes a worksheet guessing what the mystery song could be.
- Divide the class into small groups or pairs to work on different activities, improvise an ending or perform the song from memory. A more advanced activity could be to transfer the song from stick notation to stave notation using the magnetic boards.
Solfa Street / Ladder 
One student is asked to place the houses in the solfa street in the correct order. Class sings through as teacher or student points to the houses. Eventually build the students skills so they can come up and point to the solfa street or ladder. Students can transfer patterns from the solfa street onto the music stave using their individual magnetic music stave boards and magnetic counters. One group can work at the board during the activity or at the end of the activity when students are checking their answers.
Build a Song
Students can come up to the board and build the song at the board while the rest of the class write down the song in stick notation on their rhythm writing board or worksheet. You could divide the class into small groups or pairs for this activity.
Check out: http://www.heyprestoproductions.com for more interactive tips and tricks, free downloads and ‘how to guides’ to get you started with your interactive whiteboard today!